
Remote Time Machine for Multiple Macs
Time Machine, the built-in backup tool for MacOS, makes it relatively straightforward to set up a network share to be a backup target for a Mac computer. However, there are difficulties when trying to use the same share to backup multiple Mac systems. In this article, I highlight some of the issues and solutions associated with more than one computer running Time Machine backing up to a single network share.
Time Machine Remote Backups
Time Machine supports saving copies of your computer’s hard drive(s) to either a directly connected external hard drive or a shared volume on a network attached storage (NAS) device. Apple, to its credit, has been fairly open with defining the requirements for NAS support for third-party vendors, which has led to products like Synology’s Disk Station Manager (DSM) being capable of serving as destination for Time Machine backups with little setup. (See this tutorial for Synology’s recommendations on configuring their NAS for Time Machine use).
One design feature of Time Machine is that it automatically manages the saved snapshots, deleting older ones as needed and otherwise working to make best use of the backup storage space without any user intervention. This works well when the backup storage is dedicated to a single computer, for instance when using an external drive plugged into your Mac. In this case Time Machine uses the full capacity of the drive for its backups and only starts deleting older snapshots once the drive nears capacity.
Unfortunately, when more than one computer is using the same storage volume for its backups, the standard backup behavior of Time Machine becomes problematic. Not only can Time Machine backups fill one’s NAS at the expense of any other files you might wish to store, the multiple instances of Time Machine have no means of coordinating with each other and will battle each other for available space.
I came across this scenario when setting up my Synology NAS to backup two MacBooks. I set up one laptop first and tested and verified everything was working ok before setting up the second. Unfortunately, by the time I set up the second MacBook, there was insufficient space on the designated network share for Time Machine on the second computer to do an initial backup.
Quotas
Quotas are a standard way of restricting how much of a storage device can be consumed based on a limiting criteria. Synology DSM supports both directory and user quotas (enforced by the underlying btrfs filesystem used internally) and Synology’s own Time Machine instructions, in fact, show how to setup a quota on a shared folder dedicated for Time Machine backups. This quota provides an upper limit to the amount of storage the directory can use. Alternatively, using user quotas, one could set a maximum limit on storage used by a dedicated Time Machine user account. In the case of a single Mac being backed up either quota (or both) would sufficiently limit the backup size from taking storage away from other uses on the NAS. Unfortunately, neither of these quotas works well if more than one Time Machine instance is using the same folder or user.
This is the case I ran into as my user-based quota limited Time Machine to 500GB of my array. Once I set up and started to use Time Machine on my first laptop, it essentially claimed the majority of the quota available (even though I did not have anywhere near that amount of files), leaving insufficient space for the second laptop’s files. I attempted to fix this by changing the quota to ~2TB but before I could run Time Machine on the second laptop, my original laptop started a backup, saw the available space on its backup target was now larger and expanded its backup bundle size to fill most of the new space.
Possible Fixes
There were a couple ways I could potentially resolve the conflicting Time Machine backups:
-
set up a dedicated shared folder for each computer being backed up and define a quota for that folder
-
set up a dedicated Time Machine user for each and use that to establish a quota
I believe either of these could work, but I was still attracted to the idea of having a common “Backups” share and a common user for all Time Machine systems, thinking of the complexities the above solutions would pose if I added additional systems to backup later. After some searching, I came across a post by “Stux” that gave insight into an alternate solution that would allow me to keep the common folder and user setup I desired.
Time Machine GlobalQuota
In his post, Stux describes how to establish a quota for Time Machine backups that
is enforced on each backup individually. This is done via a configuration file,
.com.apple.TimeMachine.quota.plist placed in the root of the shared folder
accessed by Time Machine. Within this file, one can specify a GlobalQuota that
will be used by each Time Machine backup to limit how large it can grow.
The contents of this file are rather straightforward XML:
<?xml version="1.0" encoding="UTF-8"?>
<!DOCTYPE plist PUBLIC "-//Apple//DTD PLIST 1.0//EN" "http://www.apple.com/DTDs/PropertyList-1.0.dtd">
<plist version="1.0">
<dict>
	<key>GlobalQuota</key>
	<integer>500000000000</integer>
</dict>
</plist>
The value of GlobalQuota is in bytes so this correlates to 500 GB for each backup
… plenty for the 250 GB drives in our laptops. I’d like to say this was a simple
solution but, as oft is the case, the devil is in the details and it took me a while
to get it to work. Some things to look out for:
-
The
.plistfile must be owned byrootand not be writeable by non-root users (eg.chmod 600) -
The quota log messages mentioned in Stux’s article do not seem to appear in Catalina MacOS so one cannot use that to determine if the quota is working. See below for further details.
-
The quota is only enforced when attempting a resize of the backup bundle. This means if a bundle is already larger than the quota, the quota will not shrink the existing bundle (though I imagine it prevents it from growing larger).
-
The available sizes shown in the Time Machine status dialog do not take into account this
GlobalQuotalimit. Instead, the entire available disk space (subject to Synology’s quotas) is shown available for backups but Time Machine will only use up the the amount specified inGlobalQuota.
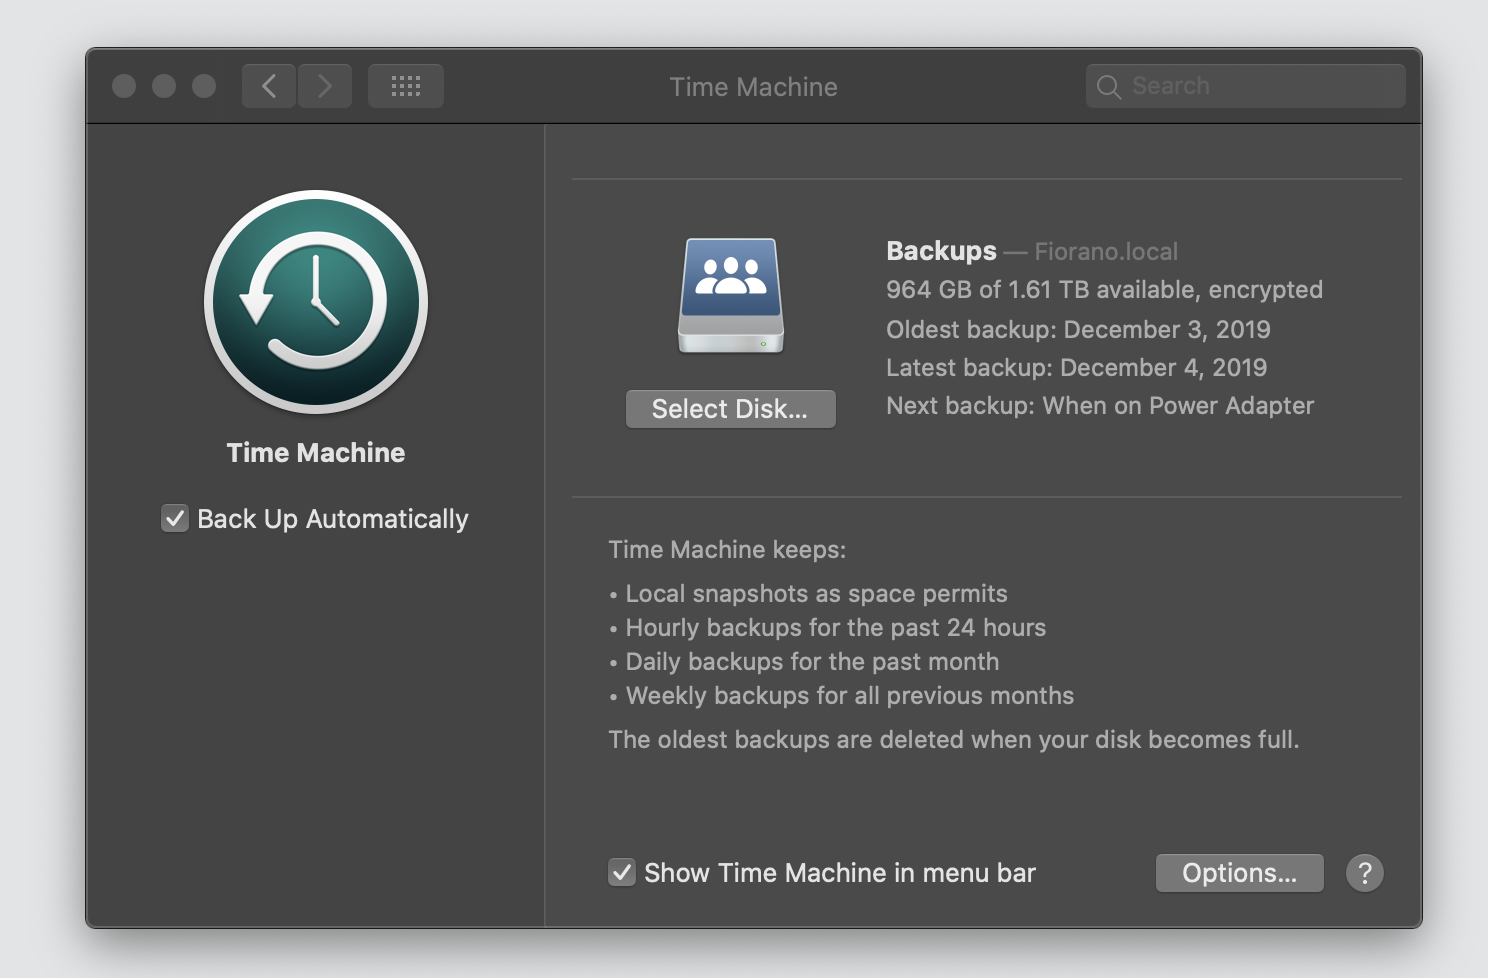
Time Machine preferences showing 1.6TB total size even though GlobalQuota limits the usable space to 500GB
With the above items in mind, I was able to get both MacBooks to use the same share
for the backups without interfering with each other. I did need to remove my initial
backup set of the first laptop and start a new backup set in order for it to recognize
the new GlobalQuota but that was not much of an issue as it was relatively new laptop
with little change history I was concerned with maintaining.
Verifying GlobalQuota
As mentioned above, the log messages referenced in Stux’s post are not present in
more recent versions of MacOS (Catalina or later) so one cannot verify the quota is
being followed using his method. However, there are two alternate methods for verifying
Time Machine is using the GlobalQuota setting appropriately.
Search Logs (Revised)
While the log messages in Stux’s post are not being output any longer, there are some
messages I have discovered that show what the quota setting is. These can be accessed
via the command line log command in MacOS by first starting a manual backup via the
“Backup Now” option in the Time Machine menubar. Wait a few minutes for Time Machine
to begin its processing and then run the following command in a terminal:
log show --last 1h --style compact --predicate '(senderImagePath contains "TimeMachine") && (eventMessage contains "size limit")' --info
This command will search the system logs for messages from Time Machine in the last hour that contain the term “size limit”. When Time Machine is configured to use a backup destination that is limited by a Time Machine quota, you will see a message similar to the following:
Filtering the log data using "senderImagePath CONTAINS "TimeMachine" AND composedMessage CONTAINS "size limit""
Skipping debug messages, pass --debug to include.
Timestamp               Ty Process[PID:TID]
2020-05-08 13:46:19.631 I  backupd[12839:c5c24] [com.apple.TimeMachine:General] 'macbook-jbowen.backupbundle' does not need resizing - current logical size is 500 GB (500,000,000,000 bytes), size limit is 500 GB (500,000,000,000 bytes)
The size limit should be equal to the value set to GlobalQuota in the .plist file.
Inspect .backupbundle
An alternate way to verify the desired quota is being used is to look at one of the files
inside the backup bundle on the NAS device itself. Apple backup bundles are stored as
directories and files on the NAS system so one can log into the Synology via ssh and
simply cd into the appropriately named bundle (in my case, macbook-jbowen.backupbundle)
Inside the bundle directory are a few text files, one of which is named Info.plist.
By inspecting the contents of this file, you can verify the maximum size of the bundle.
For instance, with my GlobalQuota set to 500GB, I see the following in Info.plist:
<?xml version="1.0" encoding="UTF-8"?>
<!DOCTYPE plist PUBLIC "-//Apple//DTD PLIST 1.0//EN" "http://www.apple.com/DTDs/PropertyList-1.0.dtd">
<plist version="1.0">
<dict>
	<key>CFBundleInfoDictionaryVersion</key>
	<string>6.0</string>
	<key>band-size</key>
	<integer>33554432</integer>
	<key>bundle-backingstore-version</key>
	<integer>1</integer>
	<key>diskimage-bundle-type</key>
	<string>com.apple.diskimage.sparsebundle</string>
	<key>size</key>
	<integer>500000000000</integer>
</dict>
</plist>
The size value in the <dict> should correspond to the value set in GlobalQuota.
Final Thoughts
One final note to consider about this approach is that it sets the same quota size for all backup sets using the same network share. For my case of two similarly spec’d laptops with the same hard drive size, this was not an issue. However, in more heterogenous environments, where different computers have different sized hard drive, this may be a concern, in which case creating individual shares or users (and their associated quotas) would likely be a more appropriate solution.
References
Here are a few additional references I used when digging into this issue:
- Stux’s article on setting up Time Machine for multiple machines: https://www.ixsystems.com/community/threads/how-to-set-up-time-machine-for-multiple-machines-with-osx-server-style-quotas.47173/
- Notes on how to view Time Machine logs in recent MacOS versions: https://superuser.com/questions/1126990/how-to-view-time-machine-log-in-macos-sierra
- Blog post noting importance of user and permissions for
.plistfile: http://movq.us/2017/04/09/time-machine-quotas/ - Good overview of how Time Machine works: https://www.baligu.com/pondini/TM/Works3.html